Hi Folks!
With my partner having a run in with COVID, I’ve been spending time finish up a lot of admin work such as emails, organizing my papers, taxes, and getting this blog updated. I spent some time at a very small convention out in Ontario, Oregon, in which I promptly got sick with the Norovirus (stomach flu) that has been ravaging the PNW for some time. It’s been a hilarious domino effect of circumstances. So thank you for everyone who is still here and offering me some support.
I don’t know if any of this will be helpful to people, but it breaks down my own fundamental thoughts on how to draw water effects.
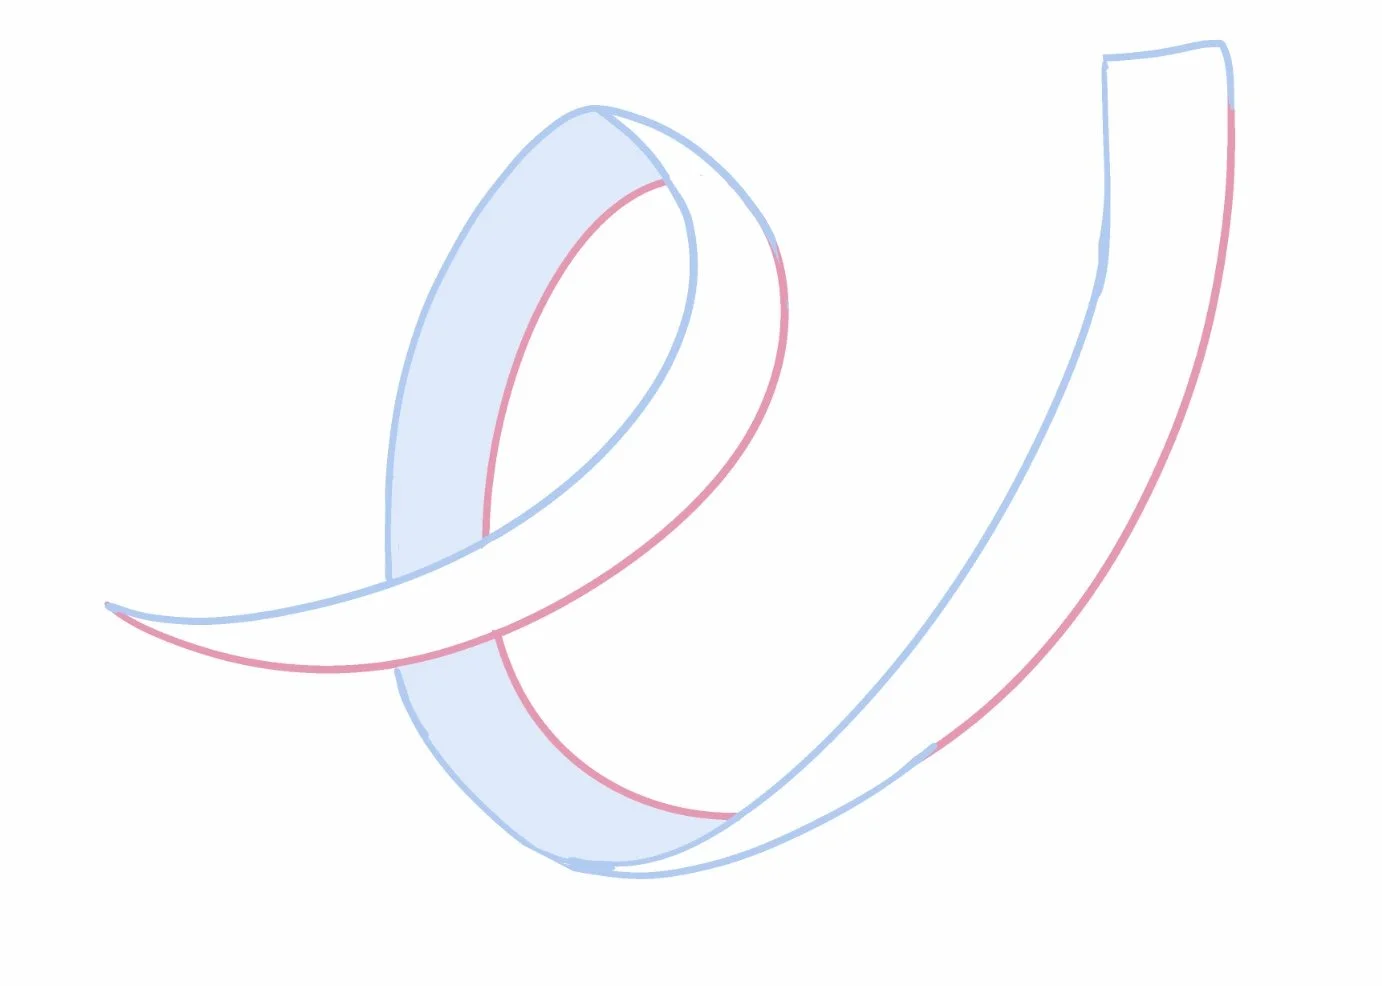
Drawing a ribbon
A big aspect of my work are ribbon-esque patterns. They permeate my art from drawing horns, fire, water, folds, and hair. There is a lot of inherit value in learning not only how to draw ribbons but to also visualize them (for those who may have aphantasia, simply having a string or reference right in front of you to toy with will also work).
Some simple rules I follow: the outlines of the ribbon will typically be parallel. One could even copy and paste the first squiggle to be offset to the first and erase overlapping features. Of course there’s a bit more to that ( e.i. making sure the ribbon flattens / is foreshortened in some areas ), but these rules are ultimately meant to keep me aware of all my pieces and how each has a potential to effect one another.
If you can, do some practice ribbons and start learning to visualize them! I usually skip this base drawing when doing any of my artwork because I can simply see it and wrap it around my brain with ease, which all came from practice.
Just draw the water
And that’s it! Just kidding, well sort of.
Now I know what you might be thinking, this is just the owl meme.
But my trick is having memorized a specific set of patterns and then spending some time noodling around ribbon patterns (and other shapes).
When I say patterns, it’s less methodical or mathematical. They are the “symbols” we use to interpret things we see around us, and just regurgitate them onto the page. Like clouds! Unless you’re some intense fan of clouds, most people will just draw them fluffy. That’s what I mean by “patterns” in this context.
Here are the most important patterns I’ve come to use with my water drawings:
The Cloud
I used clouds as an example for a reason! I use my typical cloud patterns as my foundation for sea foam or waves crashing. I struggled so much with sea foam and getting the right consistency, until I remembered a crucial detail. Clouds are made of water too… so that’s why I draw my foam like this! It’s a quick and dirty simplification that works well for me.
The Fire
Used generally for my fire effects, these weird little pointed circles do a great job making sure your waves have crests! They are the foundation to the big sweeping curves and vital for breaking up smooth shapes.
The Stream / The Droplet
These two ideas are kind of linked. If you look up pictures of slow motion water droplets, those images built the basis for these particles. I use them to jut out of the sea foam, especially if there’s a wave crash. They work hand in hand. A stream could have droplets coming out of the end of it, which gives it more motion and dynamics.
Back to the Ribbon
I’ve broken down the water effect with some notes! You still want to keep the main shape intact while you add things that “feel” water-like. Reviewing the patterns I’ve written above, you can generally see how I added the foam and droplets.
When I want the foam or white crests to have to volume, I add those fire circles, cutting into the ribbon shape to keep it more organic, and to make it feel like the water is rushing rather than it convey a steady stream. And of course I added little droplets at the ends to feel like it trails off and has more motion!
With these in mind, try out different shapes! Different ribbon widths and lengths! Make it bubbly! Fluffy! Drippy!
Til next time!


